Did you know that DigitalChalk allows you to create custom themes? With this feature you can choose the specific colors you would like to use (such as your company colors), as well as being able to upload your company logo. This helps you to better establish the look and feel of your organization.
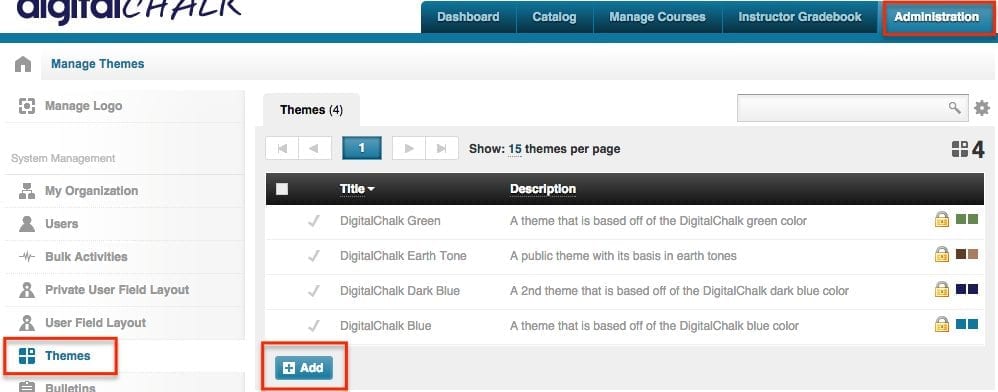
DigitalChalk gives you the ability to create a custom theme for your organization. Currently, there are 4 default themes to choose from:
- DigitalChalk Green
- DigitalChalk Earth Tone
- DigitalChalk Dark Blue
- DigitalChalk Blue
Create a Custom Theme
Creating a custom theme for your organization is an easy process – all you need is a general idea of what colors you want to use and have a logo ready to upload.
- Go the “Administration” tab.
- Select “Themes” from the left side menu.
- Click the “Add” button.
- Next, title the theme and add a description (not required) – then enter your hex codes or to use the color chart to find the colors you want.
- Click the “Save” button and you have created a custom theme!


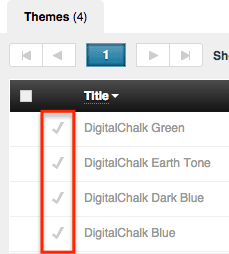
*Helpful hint: To apply the theme you will want to select the check mark to the left of the theme title and your custom theme will immediately replace the current one in place.
Another part of creating a custom theme for your organization is uploading your organization’s logo. When uploading your logo, make sure the image size is at least 300 x 75 pixels (anything larger than that the DigitalChalk system will compress to ensure that it will fit). To upload a logo follow the steps below:
- Go the “Administration” tab.
- Select “Themes” from the left side menu. In the left-hand corner you will see a “Manage Logo” option, click it and you will be taken to a new window to upload your logo.
- Click the “Choose File” button and select your logo file.

4. After choosing the correct file, click the “Upload” button and your logo will replace the current logo automatically (you will see the change in the left-hand corner).

Creating your own custom theme is an easy process, you just need to know what colors and logo you want to use!
