Sometimes it is necessary to manually register students for a course – and the DigitalChalk online training platform has created a simple process to help organizations easily register students on the administration side when needed.
How to Manually Register a Student
- Go to the “Instructor Gradebook”.

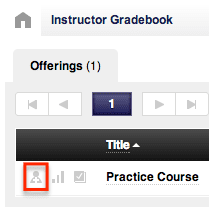
- To the left of the course offering title there are 3 icons: a box with a checkmark inside, 3 bars, and person icon with a plus inside – click the person icon.
- A new window is opened and you see a section to enter a student’s name (the student must have an account created on the online training platform in order to be able to register them). Once you begin typing their name, a list appears in a drop down menu – select the appropriate name to autofill.
- You also have the option to notify the student that they have been registered for the course – simply check the box to the left of the notify option and an email will be sent to the student once you have completed the checkout process.
- Click the “Add to cart” button and the student’s name will be added to the “Users to register” list on the right side.
- Once students have been added, you are given the “Proceed to checkout” button. You can register more than one student at a time if necessary.

